The below steps should assist you with creating a connector and a transport rule to route your outbound mail from Office 365 to ZixEncrypt.
ZixEncrypt Mail Flow Routing: O365
For additional details, please refer to the Microsoft Documentation site.
For a video version of this guide click here.
Create a conditional Connector:
- Login to Office 365
- Go to the “Admin Centers” > “Exchange”
- Go to “Mail Flow” > “Connectors”
- Press “+” to create a new connector and select the following
From: Office 365
To: Partner organization - Press Next.
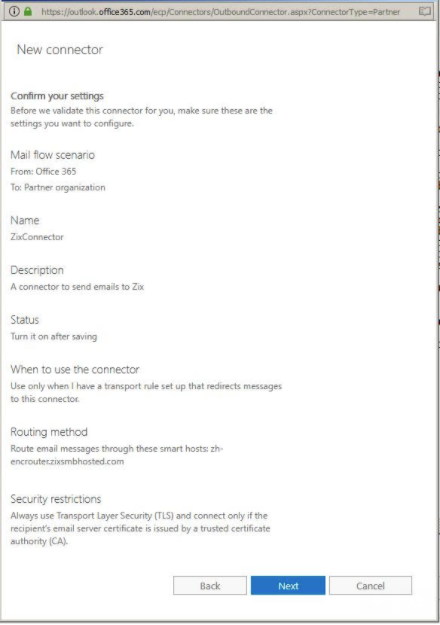
- Complete the “New Connector” as follows:
Name: “Zix Outbound Encryption “
Description: This connector routes all outbound email to the encryption smart host.
Turn On: Select this option to enable the connector - Press Next
- For “When to use Connector” select “Only when I have a transport rule setup that redirects messages to this connector”.
- Press Next.
- For “How do you want to route email” select “Route email through these smart hosts”.
- Click the “+” and enter the SmartHost servers from the email you received from BGG Operations, then press Save.
- Press Next
- Select the following options for “How should O365 connect to your partner”:
Always use Transport Layer Security (TLS) to Secure the Connection (recommended)
Issued by a trusted certificate authority (CA) - Click the Next button to verify your settings
- Click the Next button to save the connector
- The next screen will be used to validate the settings
- Press “+” to add an external email address
- Add an email address of a recipient whose domain is external to your organization, you can use ops@beaconglobalgroup.com
- Click the Validate button
- Once Office 365 has been successfully validated, click the Save button
NOTE: If a validation test fails unexpectedly, contact ops@beaconglobalgroup.com for assistance.
The completed connector may look like this:
Create a Transport Rule to use the new connector:
This transport rule helps to prevents mail loops and ensures only your company’s outbound emails (ie, not external emails sent to internal distribution lists) are routed to the connector.
- Go to the “Admin Centers” > “Exchange”
- Go to “Mail Flow” > “Rules”
- Click the “+” and select “Create new rule” from the drop down. This will open a new window.
- Click “More Options” at the bottom of the screen
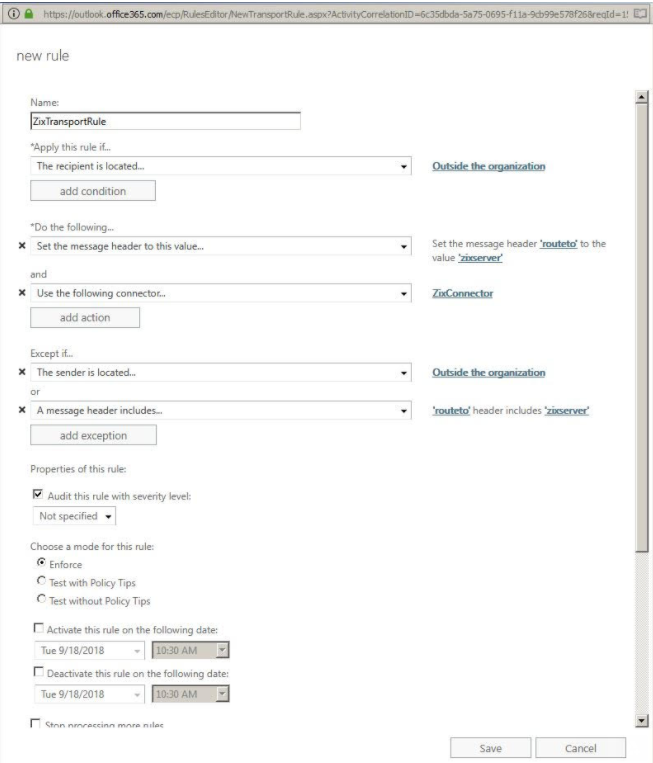
- Name the rule: Zix Encryption Rule
- Select the following options:
- Under “Apply this rule if”
- Select “The recipient…” > “is external/internal” -> “Outside the Organization”
- For Adding a single user, follow these steps
- Press Add Condition
- Select “The Sender is…” > “this person”
- Click on “Select people…” > Select the user.
- Under “Do the following”
- Select “Modify the message properties” > “set a message header”
- For Adding More than a single user, follow these steps, we suggest you set up a Security Group in Exchange Admin Center, then
- Press Add Condition
- Select “The Sender is…” > “a member of this group”
- Click on “Select group…” > Select the group.
- Under “Do the following”
- Select “Modify the message properties” > “set a message header”
- e. For Adding All users, follow these steps
- Under “Do the following”
- Select “Modify the message properties” > “set a message header”
- Set the message header ‘routeto’ to the value ‘zixserver’
- Press Add Action
- Select “Redirect the Message to” -> “the following connector” -> “Zix Outbound Encryption”
- Under “Except if…
- Press Add Exception
a. Select “The sender..” > “is external/internal” -> “Outside of the organization” - Press Add Exception
- Select “A message header” > “includes any of these words” -> ‘routeto’ header includes ‘zixserver’
- Press Save
- Open the rule and set the rule “Priority” to “0” (zero) if it isn’t already
- Click Save
- Lastly, Make sure the rule is set to “On”.
The completed transport rule may look like this:
The rule should take effect within 5 – 15 minutes, but can take up to an hour during busy periods on Exchange Online.